Your cart
Your cart is empty
Continue shopping
Drawer menu
MAKSTTON WHEEL KNOWLEDGE
“Flush wheel fitment” describes a setup in which the tire’s outermost point sits approximately in line with the outer edge of the fender at the vehicle’s target ride height. It is not one fixed combination of wheel width and offset. Calculating suitable flush-fitment specs also requires the tire’s actual width, ride height and wheel alignment, brake rotor-hat thickness, and measurements from the specific vehicle.
View the MAKSTTON Balanced Flush recommendationWheel width and wheel offset (ET) determine the wheel’s theoretical position, but the installed result depends on the whole vehicle. Actual tire section width, wheel alignment, ride height, body-panel position, and the mounting structure between the wheel and hub can all change the final fitment.
Flush Fitment Simulator | 3D View

Flush Fitment Simulator | 2D Controls
In most cases, once a tire is mounted, its outermost point extends approximately 5 mm beyond the outer wheel lip on each side.
We PreferBalanced Flush
MAKSTTON Balanced Flush is our street-oriented fitment approach: the wheel arch looks visually full, while the tire remains slightly inside the fender to preserve practical clearance for everyday driving.
For most daily-driven vehicles on factory suspension, we typically target the tire’s outermost point at approximately 5 mm inside the fender. Visually, this sits very close to a flush fitment, while the small amount of clearance remains useful when the vehicle is driven. It is a balance between stance and everyday usability, not an overly conservative setup.
Balanced Flush Fitment
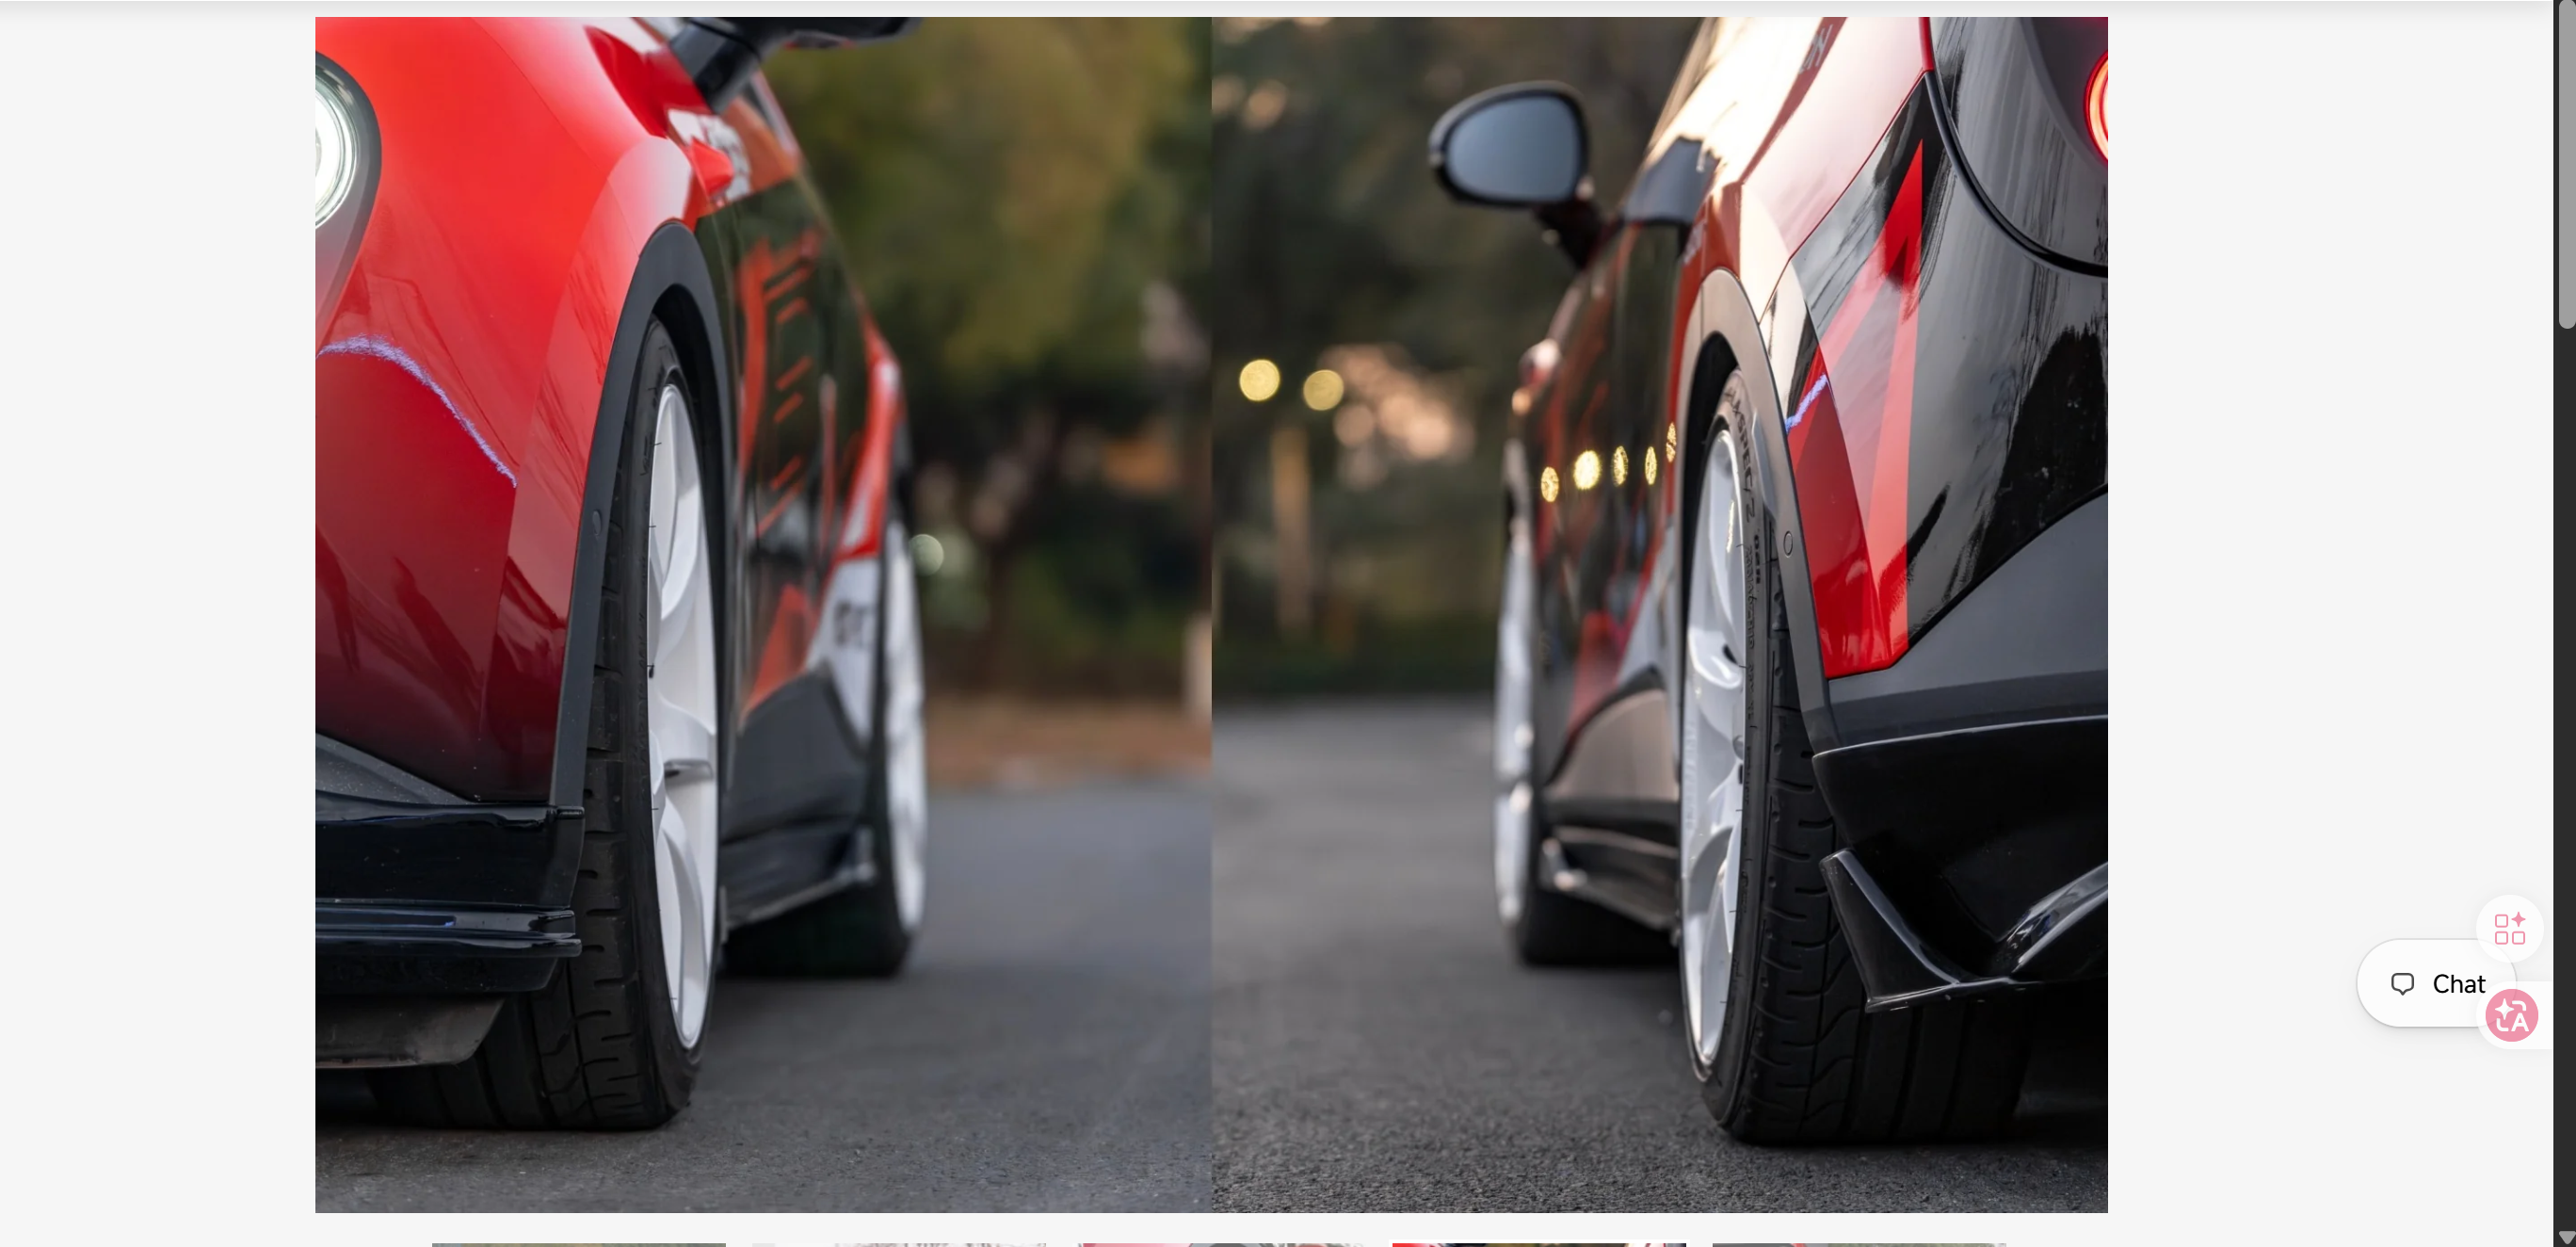
This is MAKSTTON’s preferred street setup, not a universal standard. Inset, flush, or slightly protruding fitment can all be valid choices depending on the owner’s priorities. As the wheel moves farther outward, however, the risks of throwing road debris, contacting the fender, and damaging the wheel on a curb increase. A setup that does not rub while stationary is not automatically safe through the full range of driving conditions.
Some people also ask whether changing offset affects suspension geometry, scrub radius, or even Ackermann geometry. That falls outside our area of expertise. We are comfortable explaining wheel position, the wheel-to-fender relationship, and installation space that we have measured and worked with directly, but full vehicle steering geometry should be evaluated by a chassis or suspension specialist for the specific vehicle.
Even on the same vehicle model, the same wheel specs may not produce an identical result. All six factors below matter. This article focuses on the three that are easy to overlook and directly affect flush-fitment judgment: actual tire width, aftermarket brake rotor-hat thickness, and ride height and suspension.
Fenders, subframes, and suspension mounting points all have manufacturing and assembly tolerances, so they do not occupy exactly the same coordinates on every vehicle.
Camber and toe change the tire’s position and angle, and small left-to-right differences can also change how the fitment looks.
Even with the same labeled size, tires can have different actual section widths, shoulder shapes, and sidewall profiles.
Wheel position changes only when a brake upgrade replaces the rotor or rotor hat and the old and new mounting faces have different thicknesses. Replacing only the caliper does not change wheel position.
Ride height and suspension design can change suspension geometry and camber, moving the upper edge of the wheel and tire relative to the fender.
A fender that has been repaired, removed, reinstalled, or adjusted may not sit in the same position as untouched factory bodywork.
In most cases, after a tire is mounted on a wheel, its outermost point extends approximately 5 mm beyond the outer wheel lip on each side. This is a useful starting reference, not a fixed value. Tire brand and model, wheel width, shoulder shape, and the rim protector can all change the actual position. As a result, fitting a different tire to the same wheel can produce a different flush-fitment result.
Same 235/40R18 Size, Different Actual Height
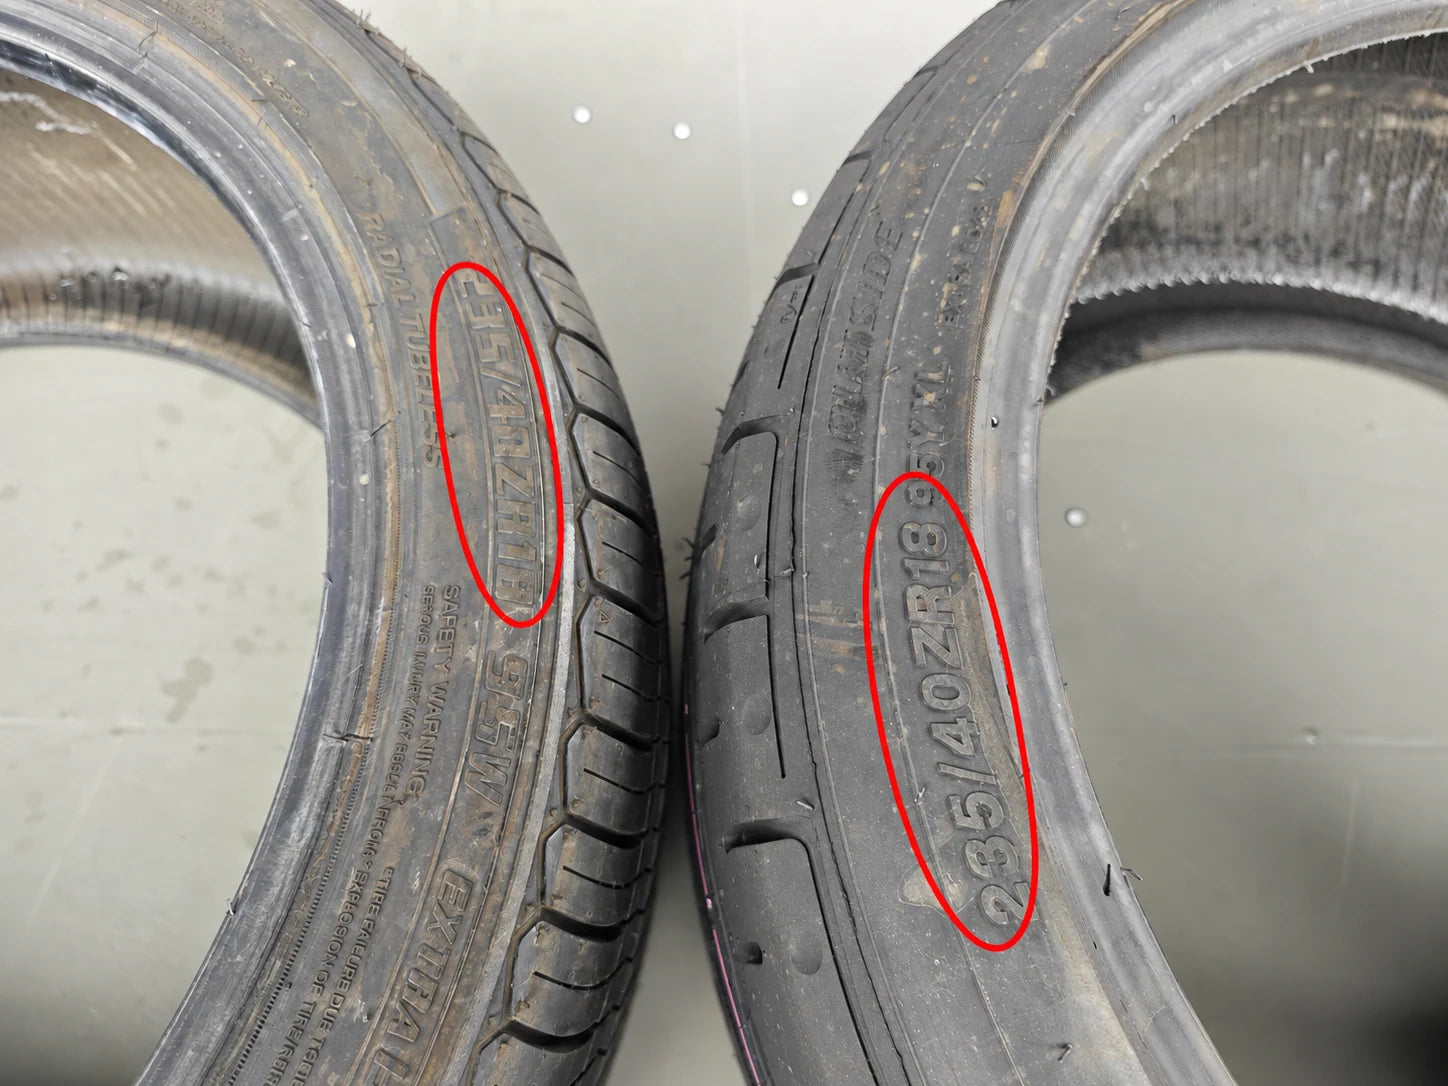 Matching 235/40R18 Sidewall Labels
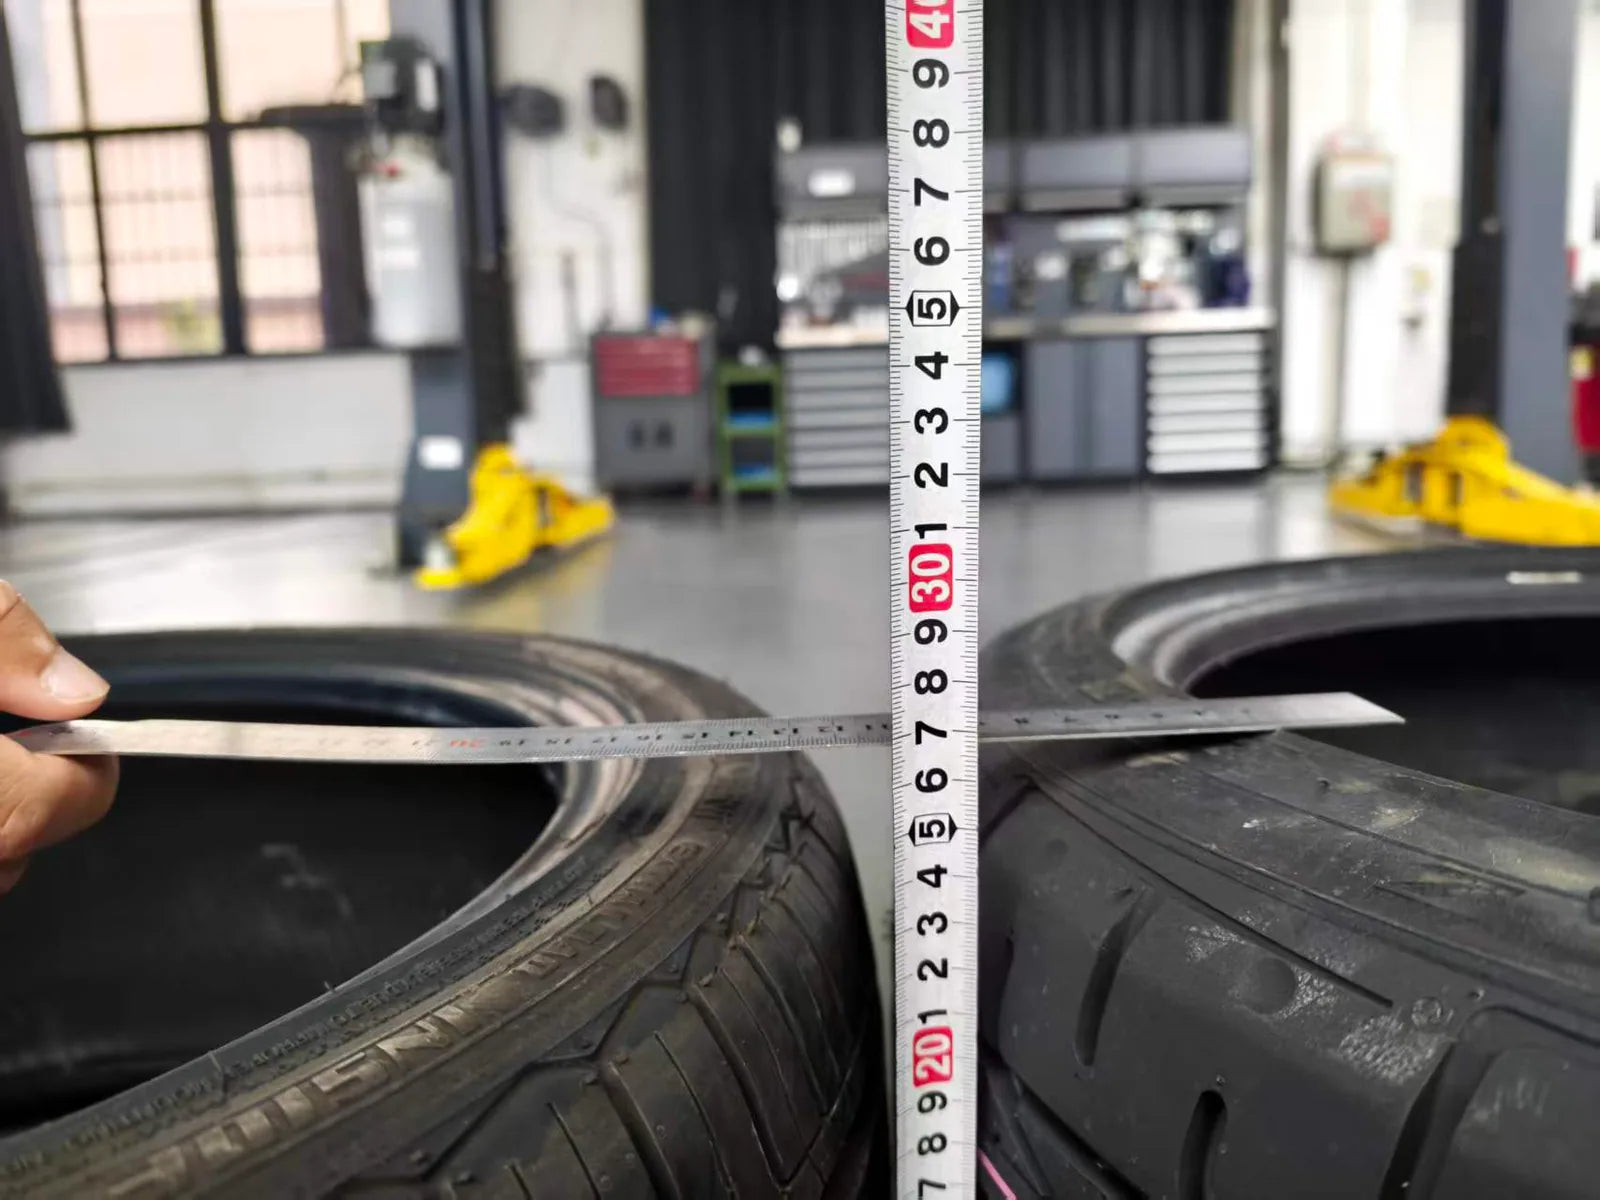 Measured Height Difference
Tire shape varies significantly between brands and models. Even with the same nominal size, the actual width, shoulder profile, and rim-protection lip can be quite different, so there is no single standard for how a tire will sit on a wheel.
Personally, I like the approach used by the VITOUR tire shown in this example. Its fuller shoulder and pronounced rim-protection lip provide better protection for the wheel edge and reduce the chance of direct contact or minor impact. The trade-off is that, for stance-focused builds, this kind of tire can make the wheel look more recessed or tucked inside the tire.
NIO ES9 | FG RE08 Fitment Case
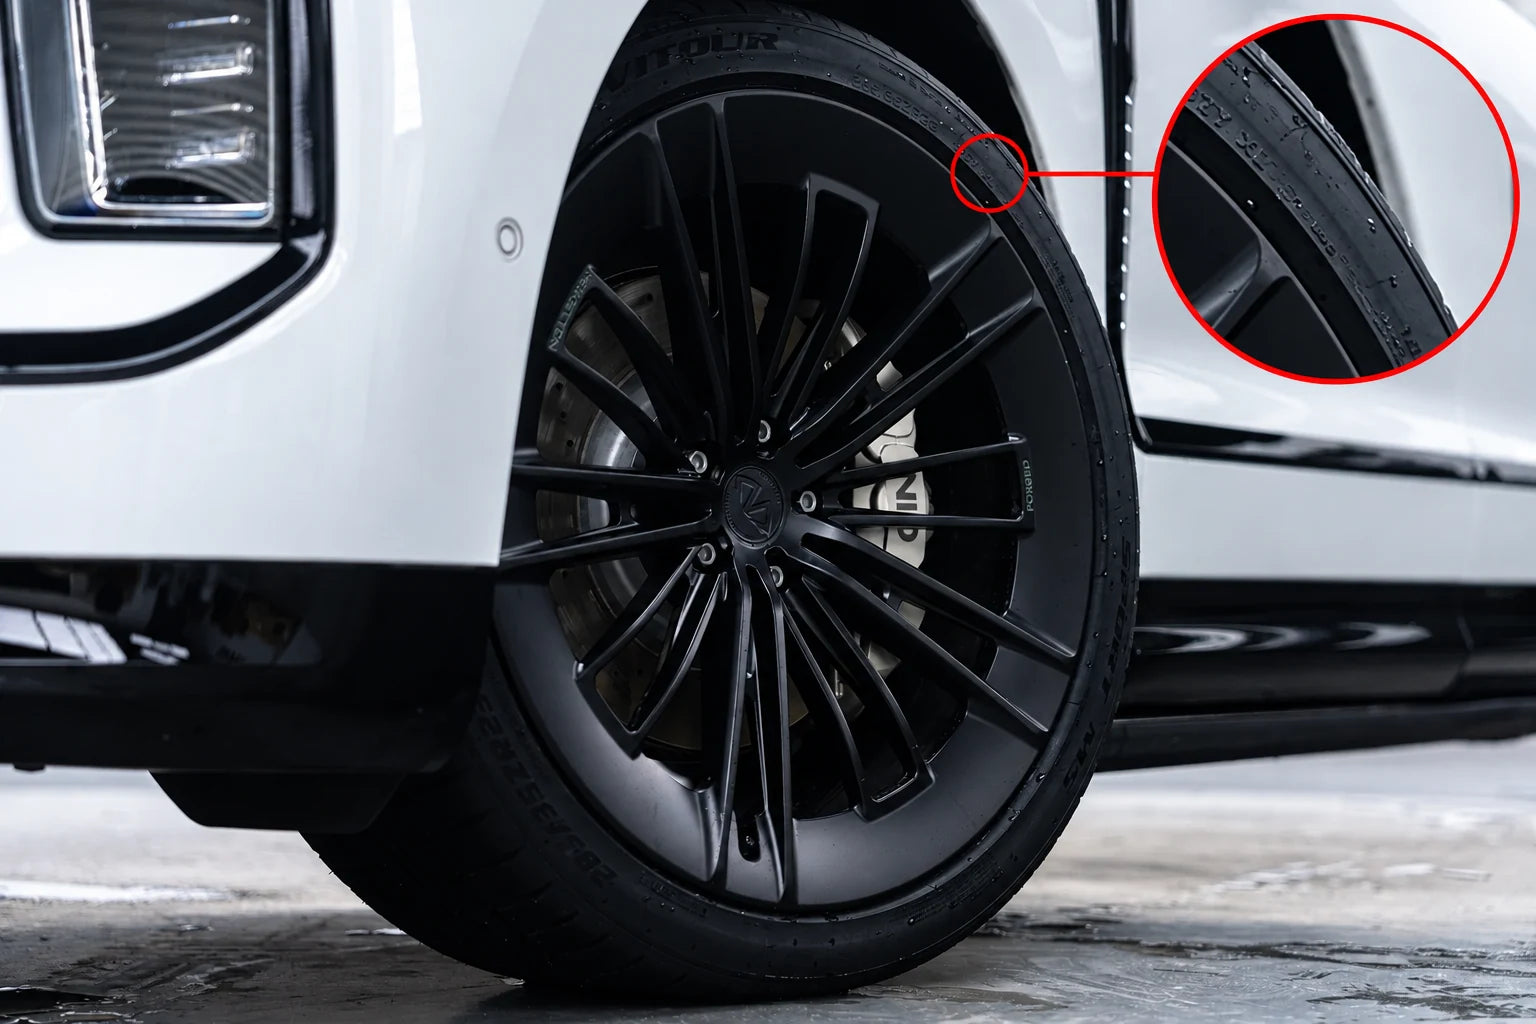
Flush fitment cannot be judged from tire size alone. What matters is where the tire’s actual outermost point sits once mounted on the intended wheel.
Whether a brake upgrade changes wheel position does not depend on the caliper simply being larger. The key question is whether the mounting-face thickness of the brake rotor hat has changed. The wheel mounts against the outer face of the rotor hat. Every additional 1 mm at that interface moves the wheel outward by 1 mm and reduces its effective offset by 1 mm.
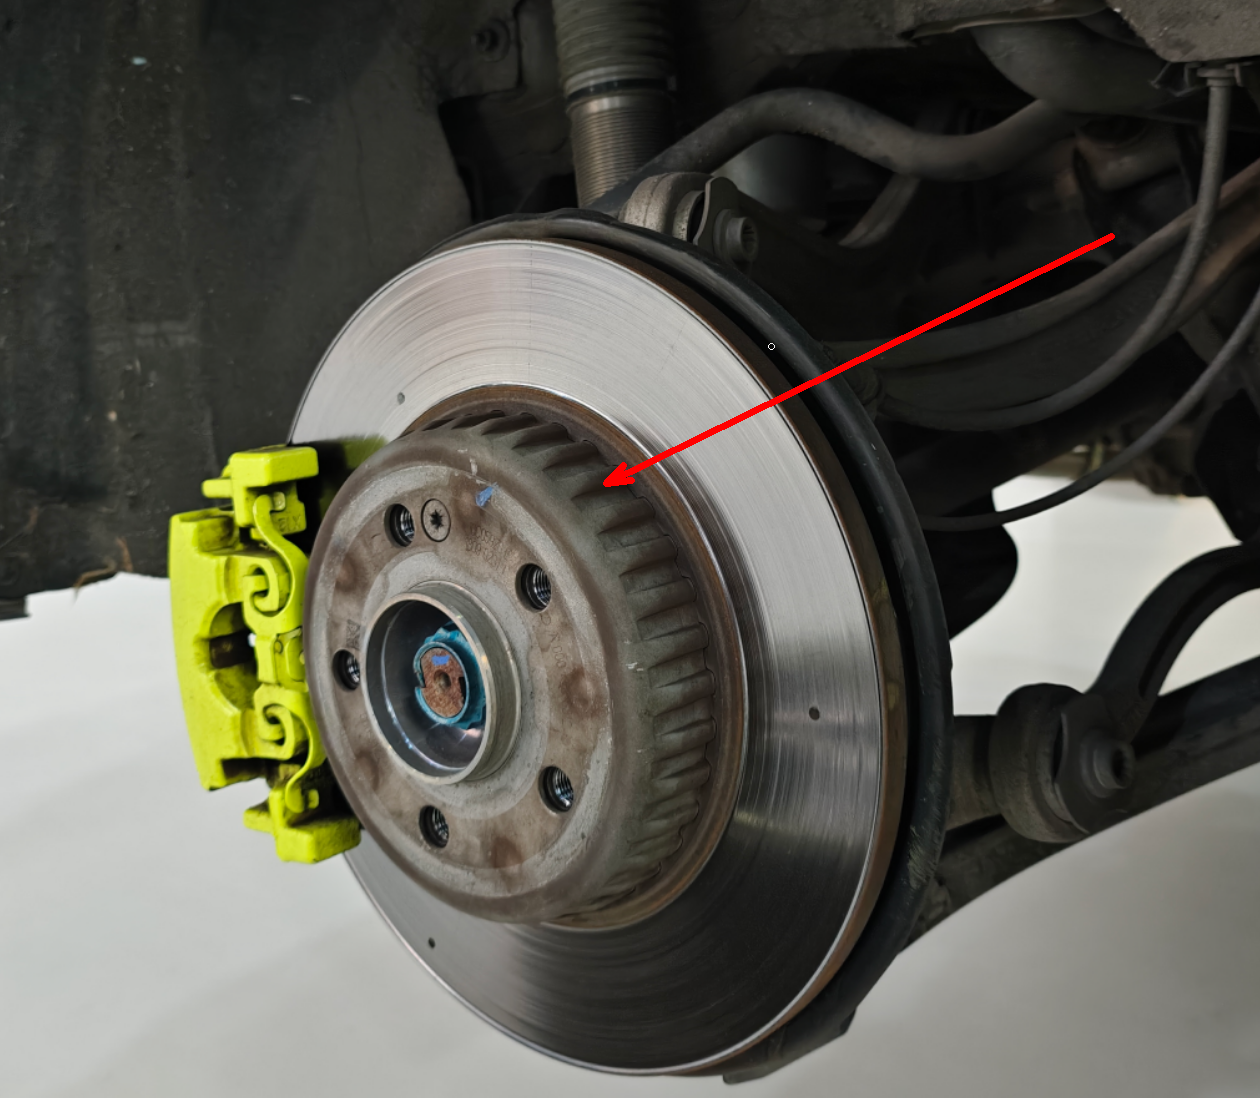
OE Brembo Co-Cast brake discs are used on some newer Mercedes-Benz models. Their steel hat can be relatively thin at the wheel-mounting area, but the actual thickness must still be measured from the specific part.
If a vehicle originally uses this rotor design, the owner may first order wheels around the factory brakes and later install a brake kit that includes a new rotor and hat. A thicker aftermarket hat can push the existing wheel farther outward. A change of approximately 5 mm is common in projects we have seen, but it is not a universal value. The actual movement must be calculated from the difference between the old and new mounting-face thicknesses.
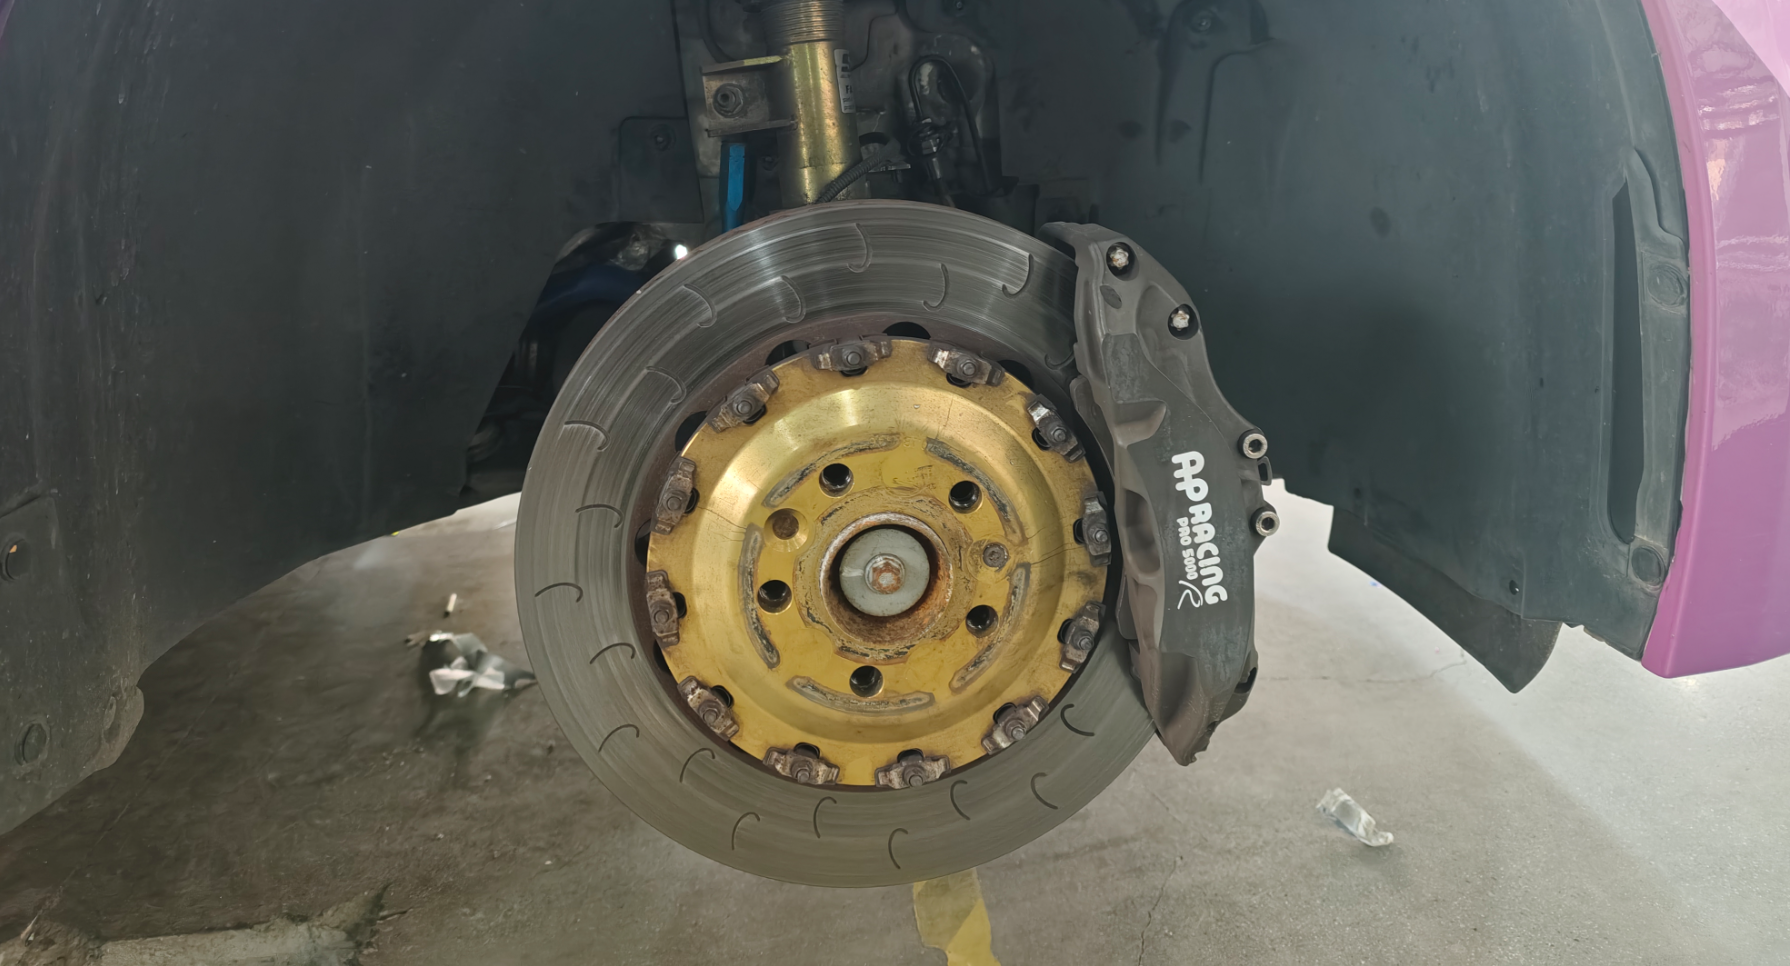
Some brake-kit manufacturers use a thicker rotor hat to help a larger caliper clear the factory wheel. In effect, the added thickness acts like an “invisible spacer” between the hub and wheel. If a vehicle already has this type of brake kit and the custom wheels are then ordered by copying the offset from another vehicle of the same model—without accounting for the change in rotor-hat mounting-face thickness—the wheels may sit farther outward than expected.
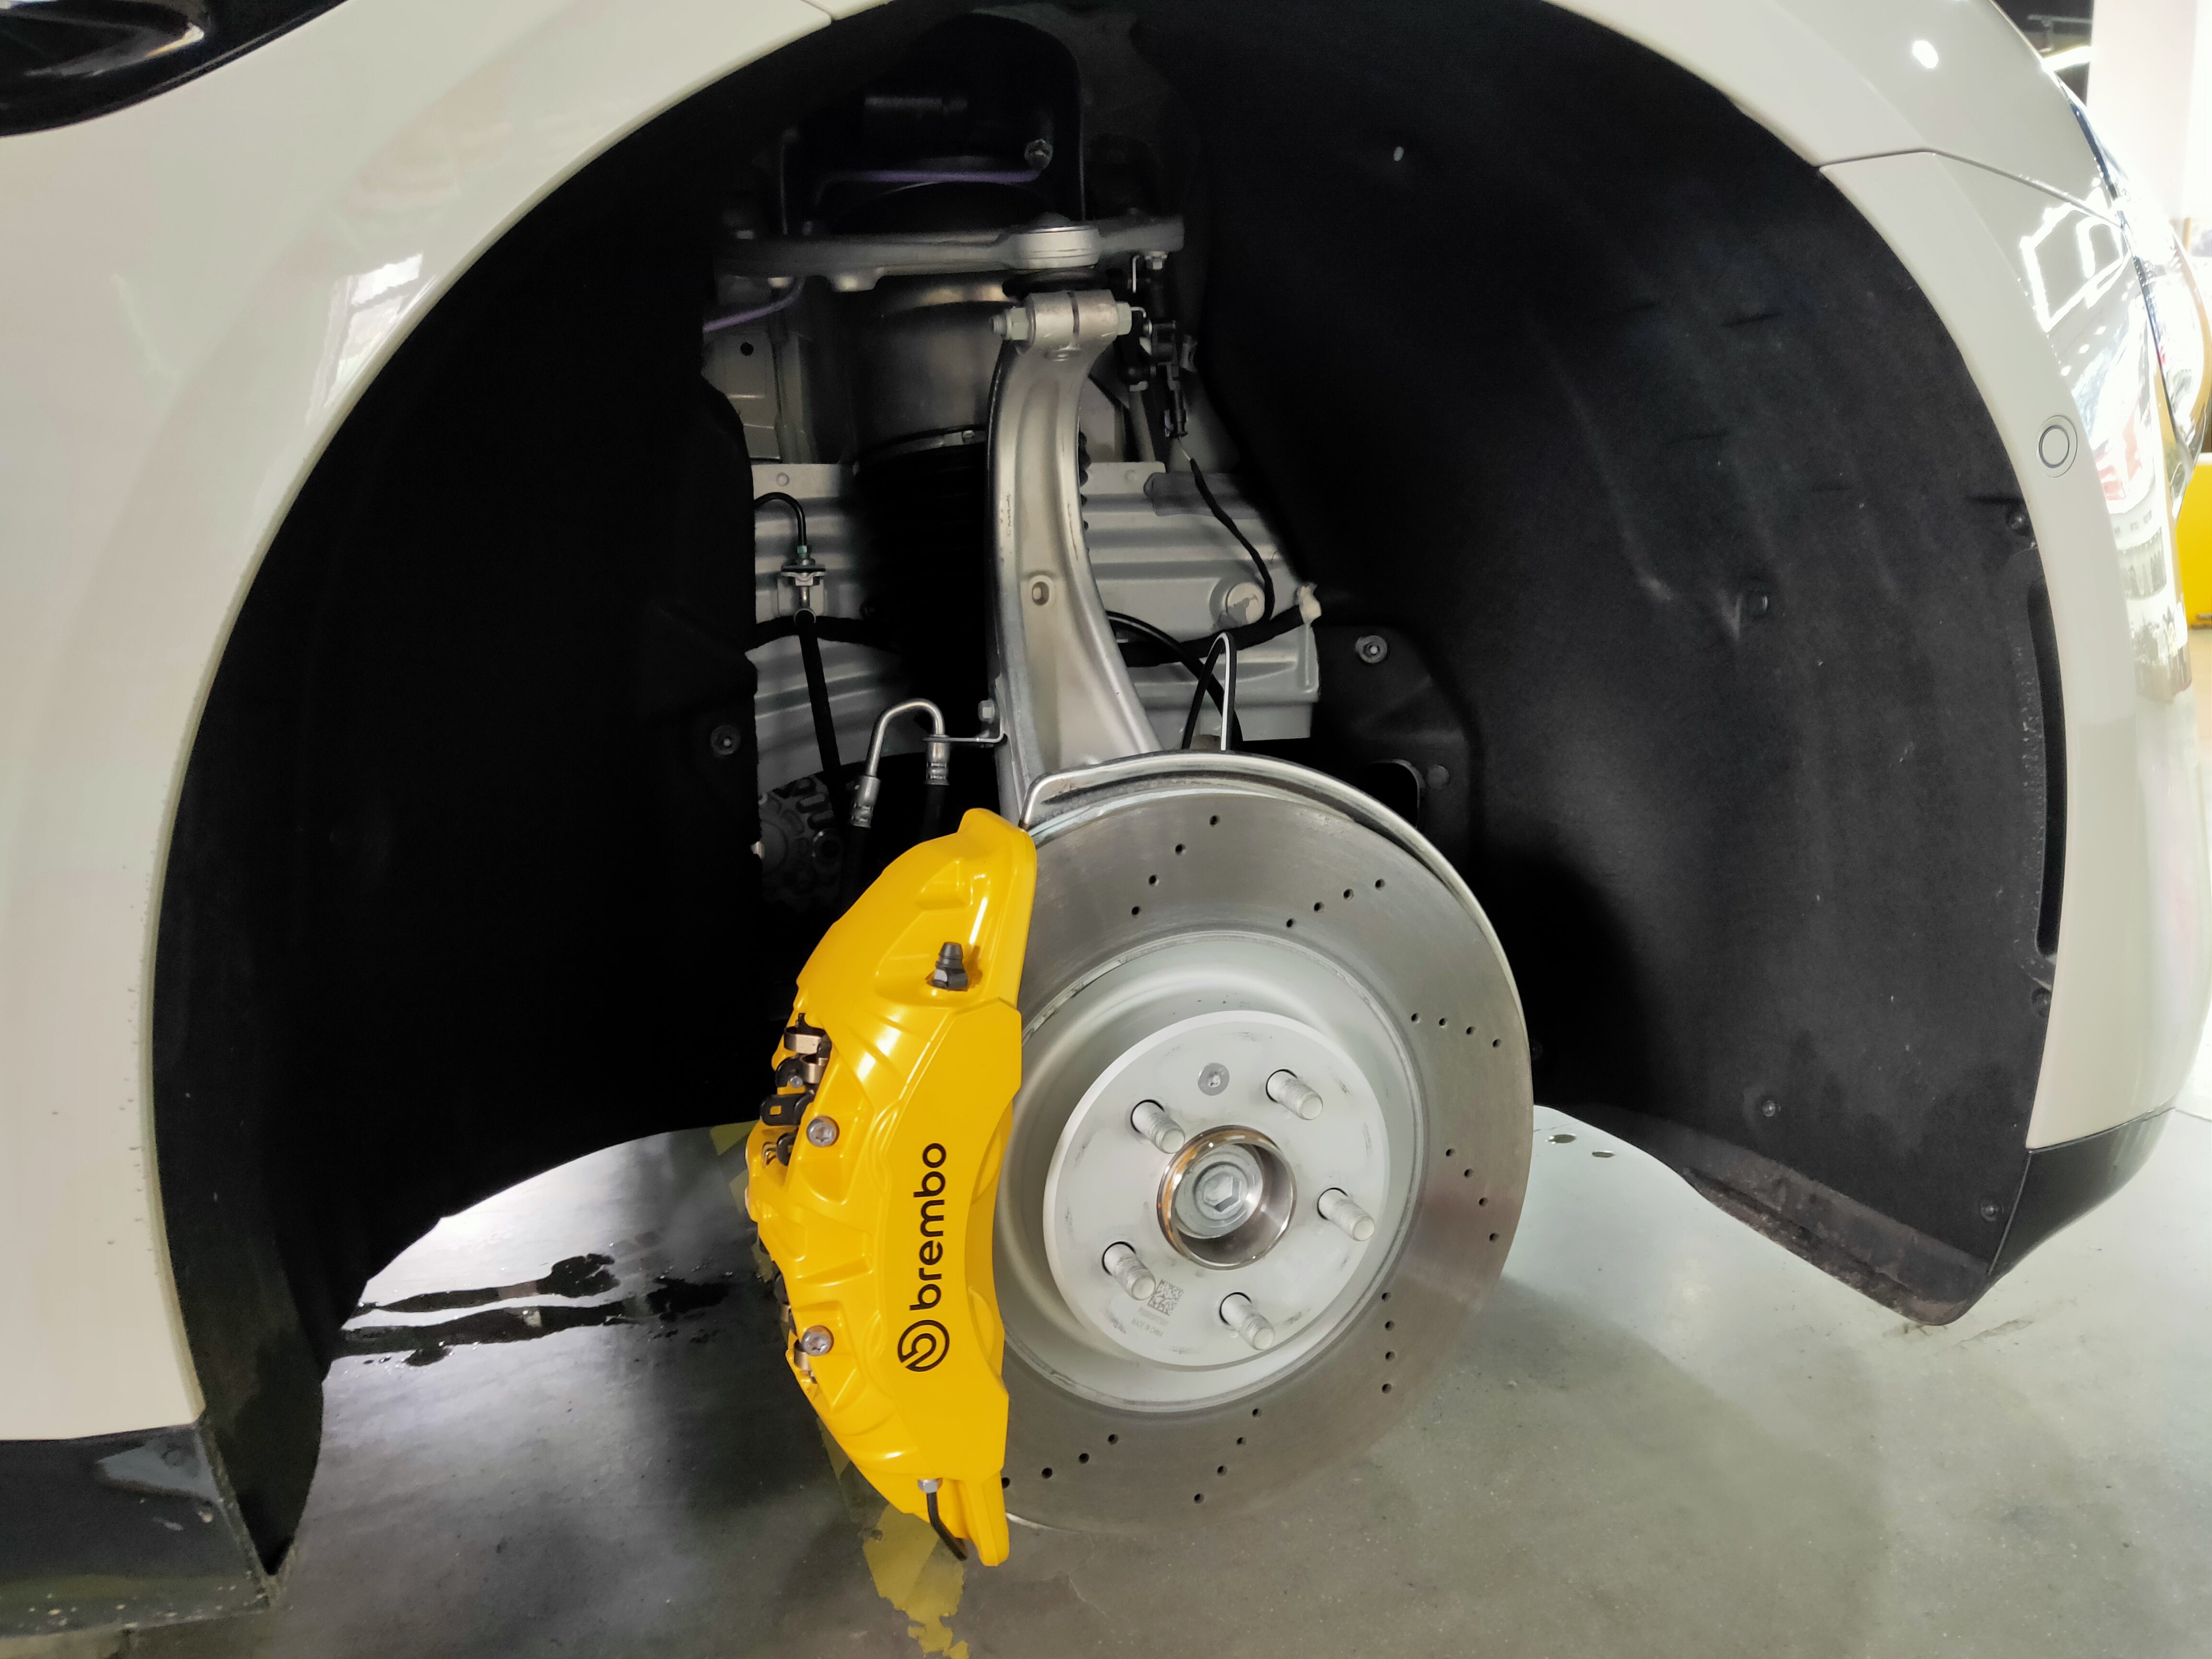
Three Brake Rotor and Hat Designs (Left to Right, Matching the Section Diagram Below)
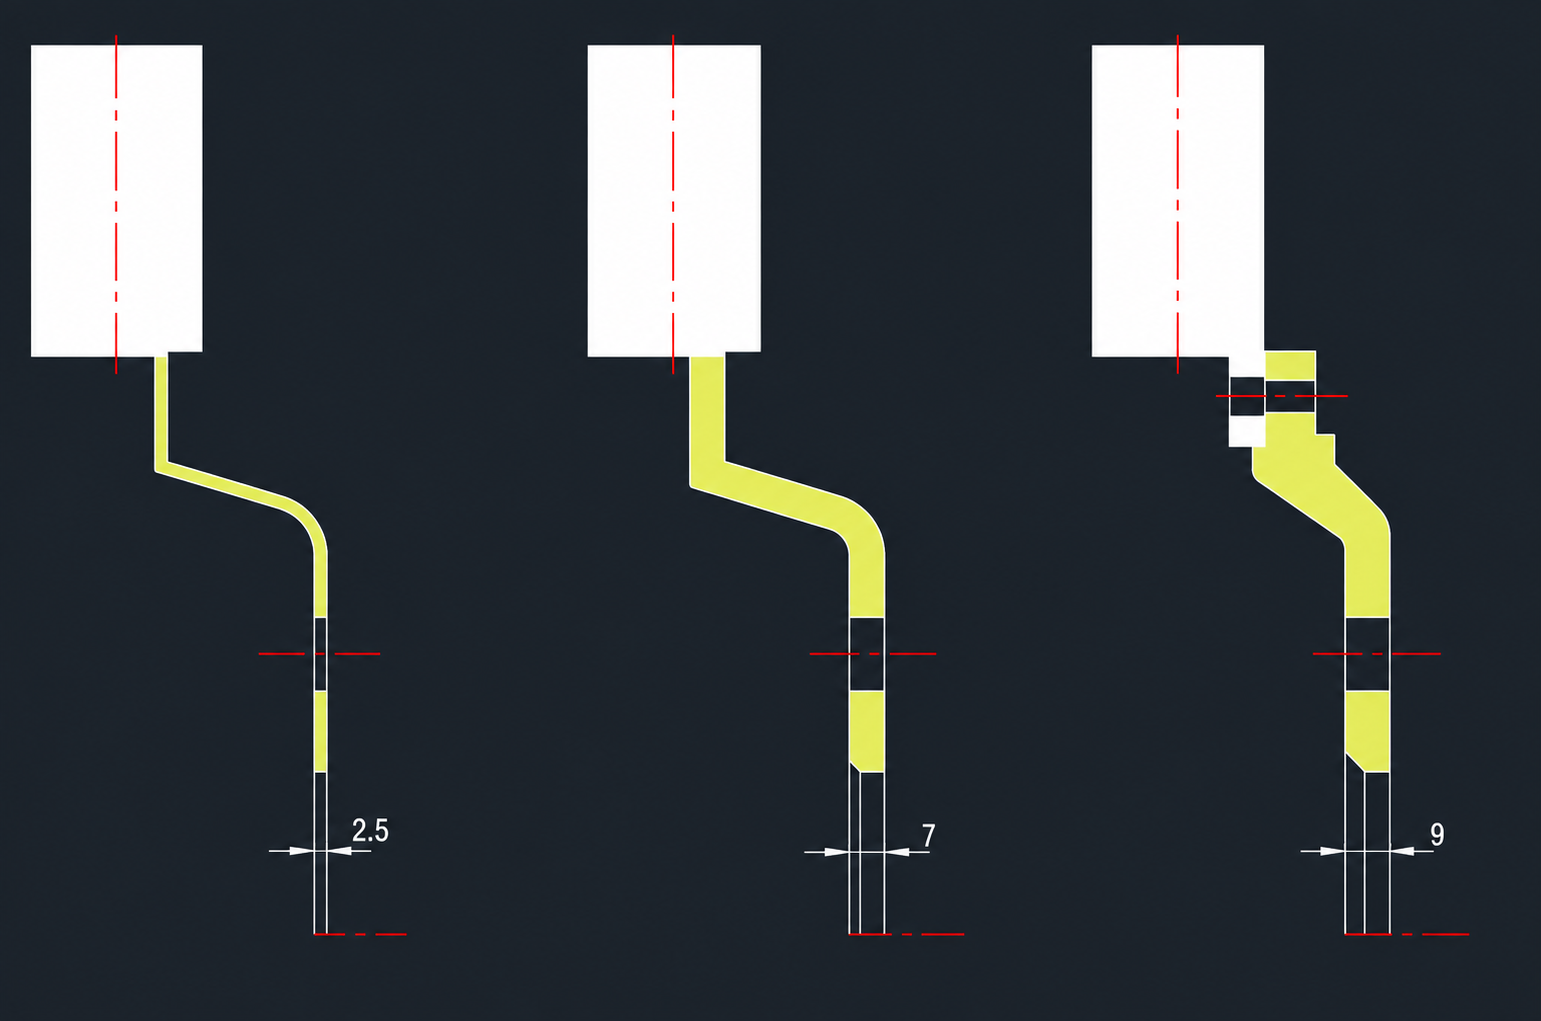
Effective Offset Based on the Installed Mounting Position
Effective offset = Wheel’s marked ET − (aftermarket mounting-face thickness − OE mounting-face thickness)
Example 1: Replace the 2.5 mm OE Brembo Co-Cast brake disc sample with the 9 mm aftermarket two-piece rotor and 7075 aluminum hat. Mounting-face thickness increases by 9 − 2.5 = 6.5 mm, so the original wheel moves outward by 6.5 mm. If the wheel is marked ET35, its installed position is equivalent to ET28.5 with the OE brake setup.
Example 2: Replace the 7 mm OE one-piece cast-iron rotor sample with the 9 mm aftermarket two-piece rotor and 7075 aluminum hat. Mounting-face thickness increases by 9 − 7 = 2 mm, so the original wheel moves outward by 2 mm. If the wheel is marked ET35, its installed position is equivalent to ET33 with the OE brake setup.
Before replacing the calipers or installing a complete brake kit, confirm two dimensions with the brake-kit manufacturer: the actual thickness where the rotor hat contacts the wheel and the overall rotor-hat height. The first determines whether the wheel will move outward relative to the fender and is the dimension used when calculating effective offset. The second primarily affects the axial relationship between the rotor and caliper and must not be confused with mounting-face thickness.
If only the caliper is replaced, the rotor and hat remain unchanged, or the old and new mounting faces have the same thickness, wheel position relative to the fender does not change. In that case, only caliper clearance behind the spokes needs to be checked.
After suspension changes, the wheel may sit differently relative to the fender even when wheel width and offset remain exactly the same. Lowering the vehicle commonly changes suspension geometry and wheel camber.
Different suspension designs do not produce the same camber change for the same reduction in ride height. In many cases, however, a lower ride height creates more negative camber, pulling the upper edge of the wheel and tire farther inboard. The same wheel specs can therefore produce noticeably different flush fitment at different ride heights.
Same Vehicle Model and Wheel Specs, Different Flush Fitment at Different Ride Heights
For vehicles with coilover suspension or lowering springs, first set the vehicle to the ride height that will be used long term and complete the wheel alignment. Only then should the wheel-to-fender position be measured.
Air suspension requires particular attention. We normally ask the owner to establish the desired aired-out stance and final parked show height before the wheel specs are measured and calculated. If the wheels are specified first and the vehicle is later lowered further or the camber is changed, the measured flush-fitment distance will also change and the final result can be significantly different.
MAKSTTON began in wheel manufacturing, but two early challenges—aftermarket brake clearance and custom widebody fitment—led us to study wheels, brakes, suspension, and bodywork as one connected system.
At the time, the aftermarket brake industry was relatively closed, and standardized caliper drawings and rotor-hat specifications were rarely available. This made caliper-to-spoke interference difficult to predict. To understand the problem, I visited several brake-component manufacturing regions in China and independently sourced, measured, installed, and tested calipers, rotor hats, and brake rotors. MAKSTTON later operated its own brake-caliper brand. Although we left that business years ago, the experience gave us first-hand knowledge of how caliper dimensions, rotor-hat thickness, wheel offset, and spoke clearance interact.
We took the same hands-on approach to our first widebody project. I purchased a vehicle and widebody kit, set the ride height and camber, measured the completed bodywork, calculated and produced the wheels, and refined the fitment through actual installation.
These experiences shaped the method MAKSTTON still uses today: begin with the vehicle’s actual configuration, then determine the wheel specifications through measurement, calculation, and real-world validation.

Flush-fitment specs are not an isolated wheel width and offset. They are the installed result used to achieve a target appearance on a particular vehicle with a defined ride height, wheel alignment, tire, brake configuration, and fender condition. A proven setup for the same vehicle model is a useful reference, but a different vehicle configuration cannot be expected to reproduce the result 1:1.
There is no single set of “perfect specs” for flush fitment on every vehicle.
For most owners, there is no need to chase an absolute flush position down to the last millimeter. A well-judged Balanced Flush fitment that combines a full visual stance with practical everyday clearance is enough.
The most reliable method is to choose the fitment you want, then measure wheel-to-fender distance and inboard space on your own vehicle at its long-term ride height and wheel-alignment settings. Use those measurements to calculate the wheel specs.
Flush wheel fitment generally means that, at the vehicle’s target ride height, the tire’s outermost point sits approximately in line with the outer edge of the fender. It describes the installed position, not one universal combination of wheel width and offset.
No. Wheel width and offset establish only the wheel’s theoretical position. The final flush-fitment result also depends on actual tire width, ride height, camber, fender position, and brake rotor-hat mounting-face thickness.
No. The wheel moves outward only when the rotor or rotor hat is replaced and the new hat has a thicker mounting face than the OE part. If only the caliper is replaced, or the old and new mounting faces have the same thickness, wheel position relative to the fender does not change. Only caliper clearance behind the spokes needs to be checked.
Lowering a vehicle can change suspension geometry and camber, pulling the upper edge of the wheel farther inboard. Vehicles on coilover suspension, lowering springs, or air suspension should first be set to the target ride height used to judge flush fitment and receive the corresponding wheel alignment. Wheel specs should then be measured and calculated from the vehicle’s actual configuration.
A proven setup for the same model is a useful reference, but it cannot guarantee a 1:1 result. Ride height, wheel alignment, tires, brake configuration, fender condition, and vehicle assembly tolerances can all change the final fitment. Measuring your own vehicle remains the most reliable method.
The size on a tire sidewall is a nominal size. Actual section width, shoulder shape, sidewall profile, and the rim protector can vary by brand and model, so the tire’s outermost point may sit differently on the same wheel.
Not necessarily. For daily-driven vehicles on factory suspension, MAKSTTON prefers a Balanced Flush setup with the tire’s outermost point approximately 5 mm inside the fender. This balances appearance with practical clearance for vehicle load, steering, and suspension compression. The 5 mm figure is a target recommendation, not a fixed standard for every vehicle.
Binghua Yang | Product Development Manager
Technical data: Renbing Xiong | Technical Department

